I have budgeted every single dollar I’ve made since college with YNAB. It’s helped me make almost every major financial decision and helped me build a more positive relationship with money. But I also know that coming into it for the first time can be confusing.
YNAB encourages you to think about money differently. Using the tool, you’ll only budget the dollars you have in hand right now, prioritize what expenses are coming up that your money needs to cover, and thoughtfully make choices about your priorities. It’s powerful.
Yet, what makes YNAB different and amazing is also what makes it hard. If you’ve always thought about budgeting a certain way, using YNAB can feel uncomfortable at first. At least until you’ve figured out the system.
That’s why I’ve created this complete setup guide. I’ll take you step-by-step through signing up for and organizing YNAB. There are screenshots and gifs so you’re not stuck searching for buttons and explanations of why things work the way they do.
YNAB has a lot of features and this guide won’t cover every possible use and tool. But it will give you everything you need to get started with confidence. The rest you can learn along the way.
Ready? Let’s dive in.
Table of Contents
A Brief History of You Need A Budget (YNAB)
![]() In 2003 after Jesse Mecham and his wife married he quickly learned they needed to manage their finances better. He started with a basic spreadsheet-style template to manage his family’s finances. In 2004 this spreadsheet-style template became the first version of YNAB.
In 2003 after Jesse Mecham and his wife married he quickly learned they needed to manage their finances better. He started with a basic spreadsheet-style template to manage his family’s finances. In 2004 this spreadsheet-style template became the first version of YNAB.
Over the years YNAB has progressed and has been updated to meet the demands of its customers. In late 2015 the cloud-based version of YNAB entered the marketplace. This is the version we see today when logging into the YNAB software.
If you like to budget on the go, YNAB has both an Apple and Android app that is free with your subscription.
The best part of the cloud version is the continuous updates. Since the software lives online, the team can work behind the scenes and make any necessary updates. If you are curious about what has been updated you can read their “release notes” and if there is something upcoming you can read their “up next” section.
How is YNAB Different Than Other Budgeting Software?
Before we set up YNAB I want to share with your what makes YNAB stand apart from its competitors. One of the first things you need to understand before getting started with YNAB is that it plays by its own rules.
These rules take some getting used to and they aren’t for everyone. But with practice, YNAB has changed many people’s lives and the way they think about money. Honestly, I love the YNAB rules and think it can help you really transform how you think about your money, priorities, and cash flows, even if you choose not to do it forever.
Rule One: Give Every Dollar A Job
This will make you be more intentional with your money. You will know exactly what each dollar needs to do for you this month. You’ll notice that you are not frivolously spending money each month when you give every dollar a job.
Rule Two: Embrace Your True Expenses
Knowing what your true expenses are, both now and in the future, will help you decide how your money needs to be used throughout the month.
Rule Three: Roll With the Punches
Life happens. YNAB understands and celebrates that. As things come up throughout the month, you will need to change your budget, and that is perfectly okay.
Rule Four: Age Your Money
You will want to work toward living on last month’s income. This may not happen right away but as you work toward breaking the paycheck to paycheck cycle you’ll notice a sense of peace come over you.
RELATED: You Need a Budget: Book Review
The Beginner’s Guide To YNAB: Getting Started
Have you thought about using You Need A Budget (YNAB) for your budgeting needs but felt overwhelmed with the cloud-based software? I completely understand. I often hear others say that they do not understand YNAB or they couldn’t get it to work for their budgeting needs. Once you have an understanding of how the software is laid out you’ll be in budgeting heaven.
In this beginner’s guide to YNAB I am going to walk you through the steps of setting up YNAB and starting your 34-day free trial. When you sign up through this link you’ll also receive one free month when you subscribe to the software.
It doesn’t matter what day of the week it is, you can start budgeting with YNAB right away!
Prefer an All-in-One Video?
We did a complete YNAB setup and troubleshooting Facebook live for beginners. You can watch the replay below or go through the step-by-step guide, with helpful gifs, below.
I highly recommend coming back to this video after you read the guide. Because it was a Facebook Live, I had the opportunity to answer many questions about the software so there are some additional details in the video that are not in the basic guide.
Sign Up for a Free Trial
The first thing you will want to do is sign up for a free trial using this link. When you sign up through this special link you’ll have access to the free one month trial!
When signing up for the free trial you will not be required to enter a credit card. You’ll enter your card information if you decide to stay with the software. Don’t worry, you will receive reminders when your free trial is coming to an end.
With YNAB you will only be budgeting the money you currently have in your bank account. You will no longer be forecasting your money, as you do with other budgeting programs (i.e. making a budget at the beginning of the month). With YNAB you will be budgeting your money every time you receive income. This means you will be able to start budgeting at any point throughout the month.
Create Your First YNAB Budget
Now that you have created your free account we will work on setting up your first budget. This is the fun part of YNAB! It is completely customizable and can be tailored to your family’s needs.
You will want to create a name for your budget. This can be something as simple as “Family Budget” or even your name. Then you can choose your currency, number format, currency placement, and date format. The variety of options make this software great if you are outside of the United States. You will still be able to use YNAB.
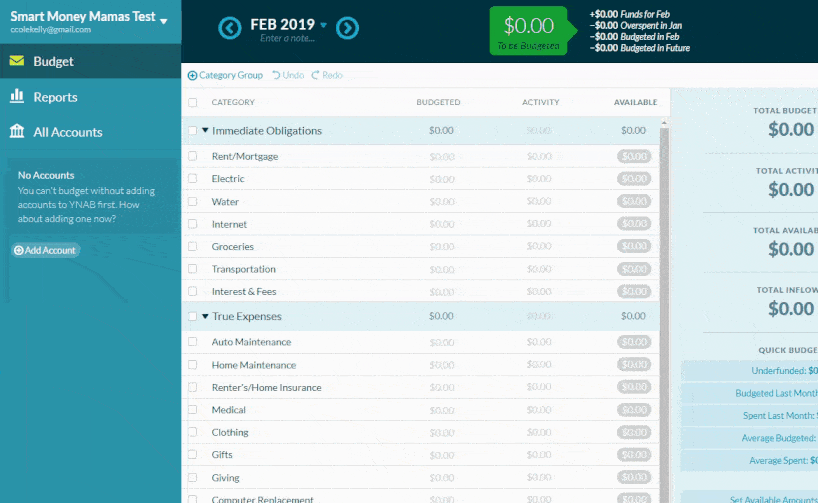
Once you have decided on your options you will click “create budget” on the bottom right and we are ready to get started. YNAB will walk you through the setup process but I will show you some tricks that I have learned along the way.
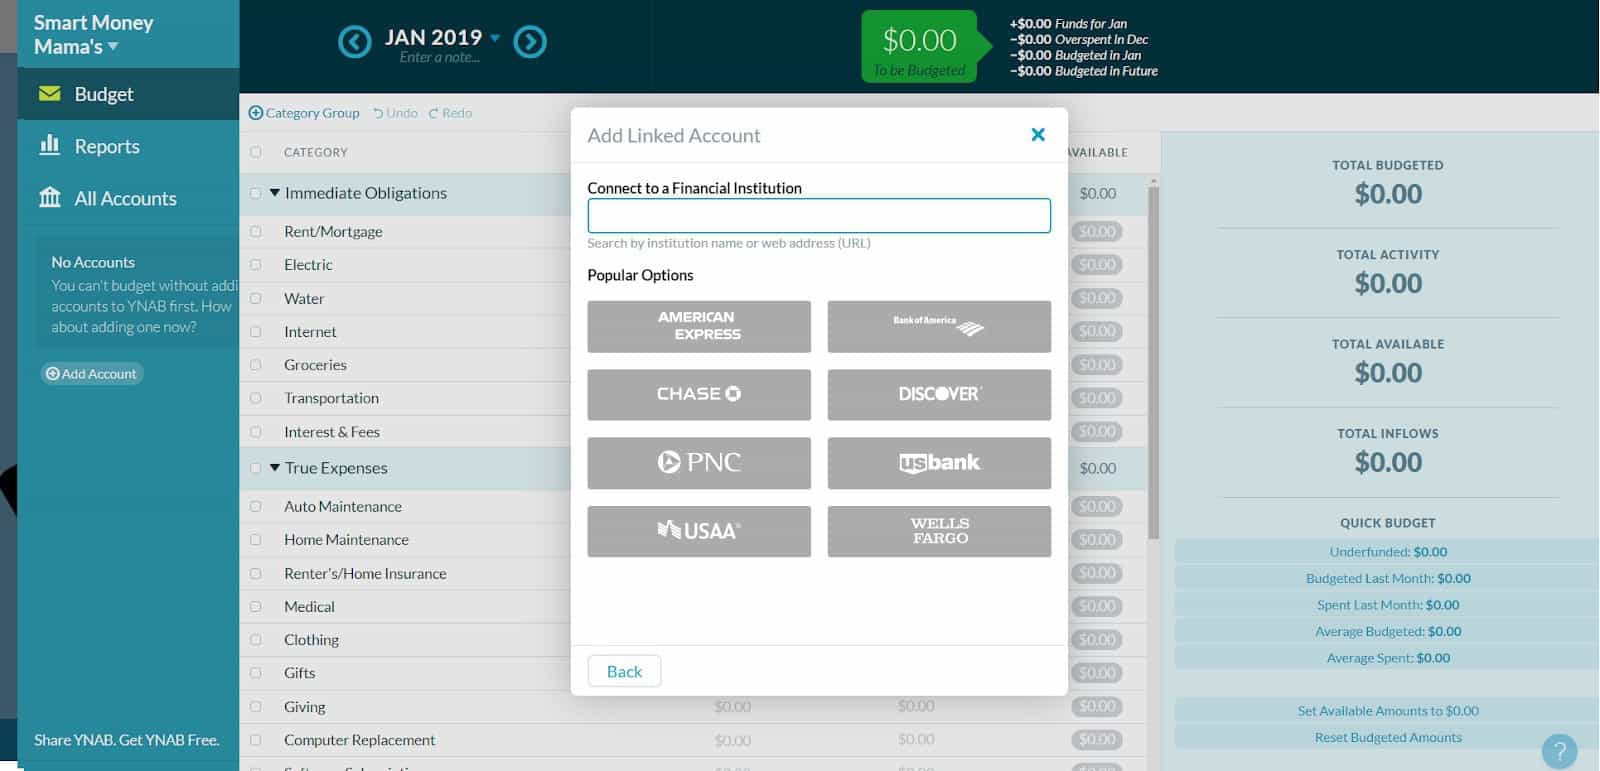
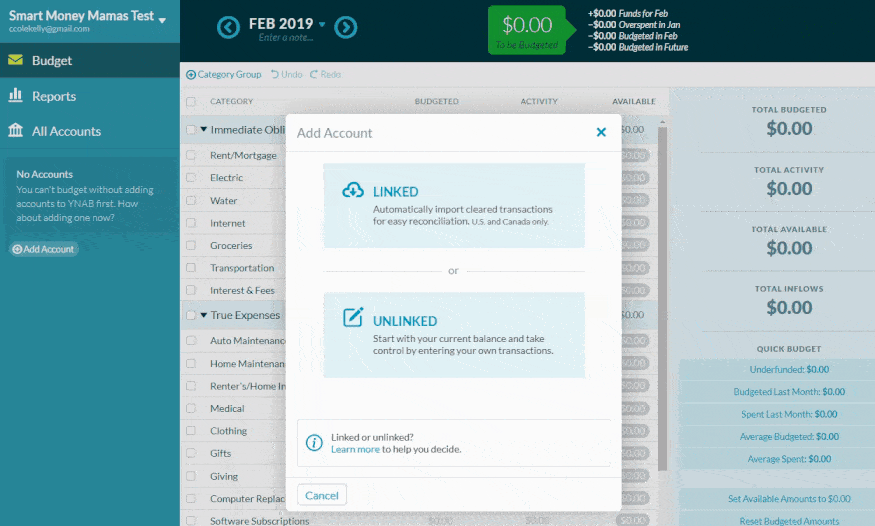
Choose Linked or Unlinked Accounts
The first decision you will make with your budget is if you want to have your accounts linked or unlinked. I personally love the cloud-based software because your accounts can be linked (if you are in the United States or Canada).

A linked account means YNAB will automatically import your transactions for you. This normally takes about 24 hours after the transaction is made to be available for import.
If you are new to budgeting and need the daily action of entering transactions, you will want to chose unlinked. Don’t worry, if you decide to use unlinked accounts now, you can always link them at a later date.
Add Your Bank Accounts
Once you have made your decision you will start to add your accounts.
You will want to add every account possible to ensure you have a true picture of your money. This includes all savings, checking, money market, and credit card accounts etc.
If you are using linked accounts you will need to choose your financial institution and enter your sign-in information. (Concerned about security? Read YNAB’s security policy.)
If you are not linking your accounts your screen will look a bit different in the beginning. You will manually input all of your information.
We will start by selecting an account type.
You can give your account a nickname if needed. This is great if you have more than one savings account or credit card. You can name each account something easy for you to remember. This will help you keep track of your accounts and money. You’ll also want to enter your current account balance.
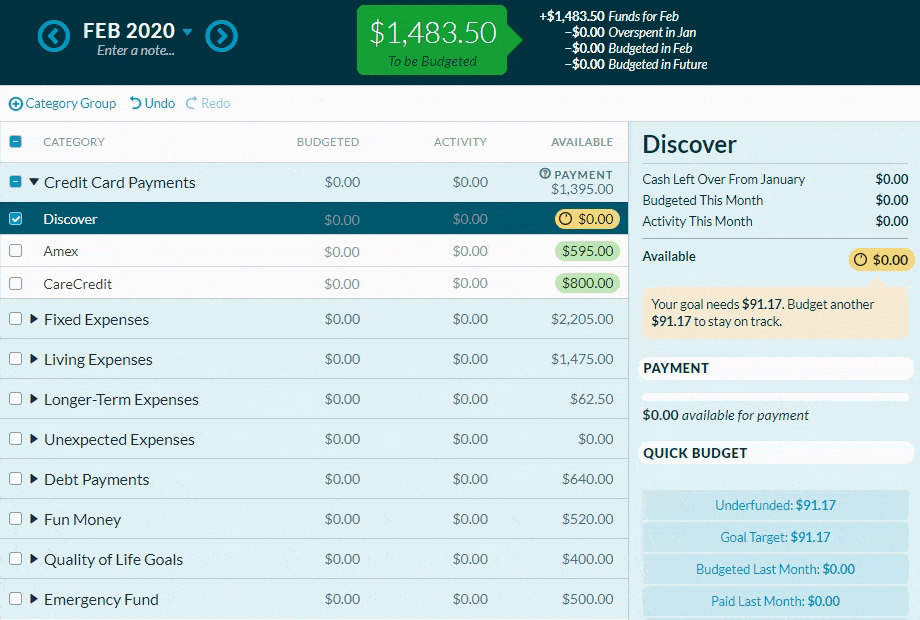
Adding Credit Cards & Debts
Handling credit cards and debts with YNAB is where many people get stuck. Don’t worry! The system is actually set up to help you pay off debt and has some great tools for doing just that.
When you add a credit card (like in the video below), you’ll be given the option of budgeting to pay your balance off in full each month or create a goal to pay your balance off over time.
If you choose to pay your balance off in full, the first time you set up your budget, you’ll have to allocate the amount of your starting balance to that card in your budget. From then on, YNAB will treat any credit card expenses like cash. It assumes you’re always paying off all those transactions in full before you pay interest.
If you choose to set a goal, you can set a goal based on how much you want to put towards the card a month or based on when you want to have that balance completely paid off. This will create a budget goal for your credit card. If you have new expenses on that card and overspend in a category, YNAB will mark those categories yellow or orange to let you know you have overspent on a credit card without the cash allocated to cover it.
This helps you identify when you are creating new debts.
The credit card line in the budget itself will also be yellow if you haven’t reached your payoff goal for that month yet. As seen below.
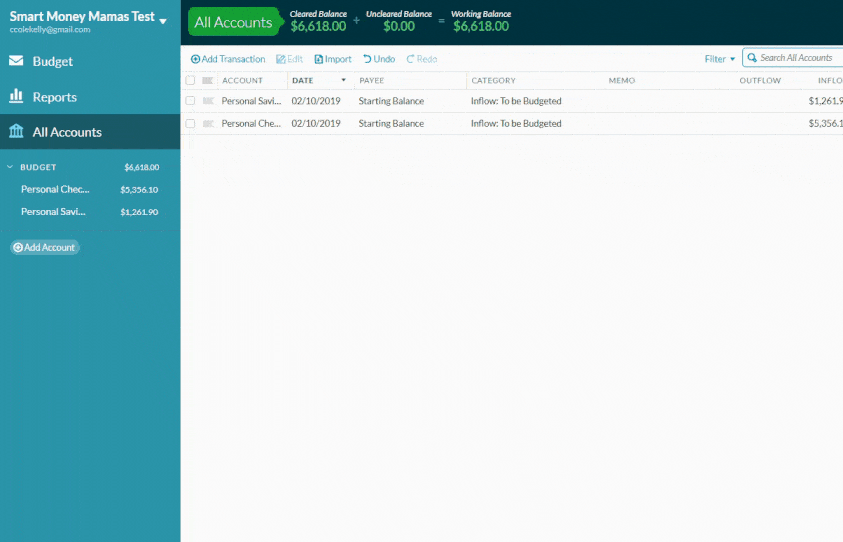
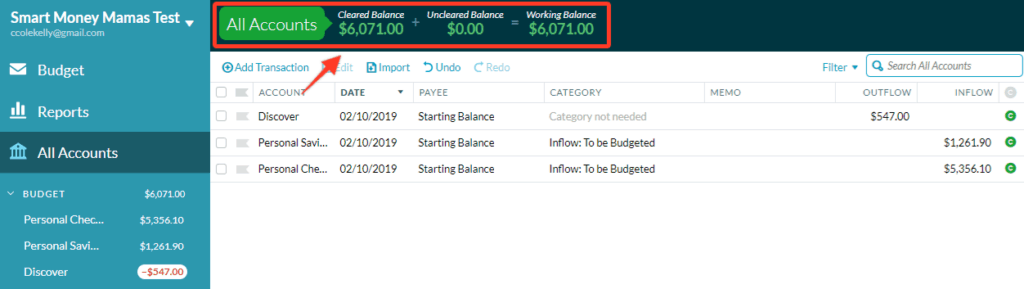
Finish Entering All Accounts
Once you have finished entering your accounts you should have a screen that looks something like this. It will show you your date, starting balance, inflow, and amount.
You’ll notice on the left side it is highlighted as All Accounts. This is a total balance of all accounts we have added to our budget.
Now that we have money in YNAB it is time to get to business. We are now going to budget our money!
Allocate Your First YNAB Budget
Click that top left button that says Budget with the envelope. This will take you to the main budgeting screen.
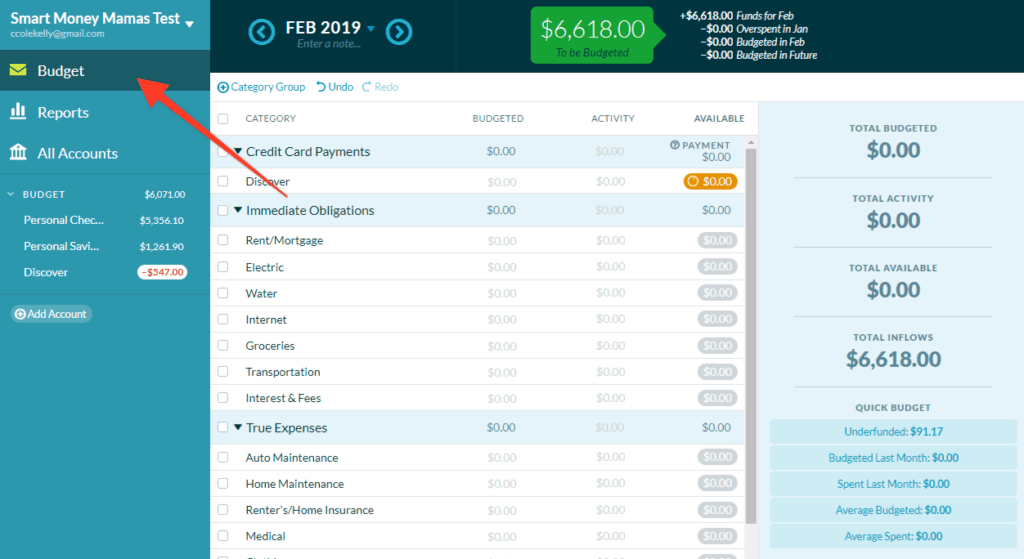
You will notice your accounts on the left-hand side, your budget categories in the middle, your to-be budgeted at the top, and your totals on the right.
We are going to leave the predetermined categories from YNAB alone in this demonstration. If you would like to change the categories or subcategories all you need to do is click on the title. You will be able to change the title, hide the category, and delete the category.
If you have budgeted money to a category at any point in this budgets history you do not want to delete it! You will hide the category moving forward.
We are going to budget our “to be budgeted” to zero like YNAB’s first rule states. We want every dollar to have a job.
Rule Two: Embrace Your True Expenses
You will want to think about any upcoming bills you have that need to be paid before your next source of income is deposited. Be sure to cover any known expenses you have.
You will notice as we begin to budget our money the top “to be budgeted” bubble is being reduced. This is because those dollars are now doing a job for us. You’ll see that I have budgeted money for my immediate obligations. These are non-negotiable bills that are due soon and are very important.
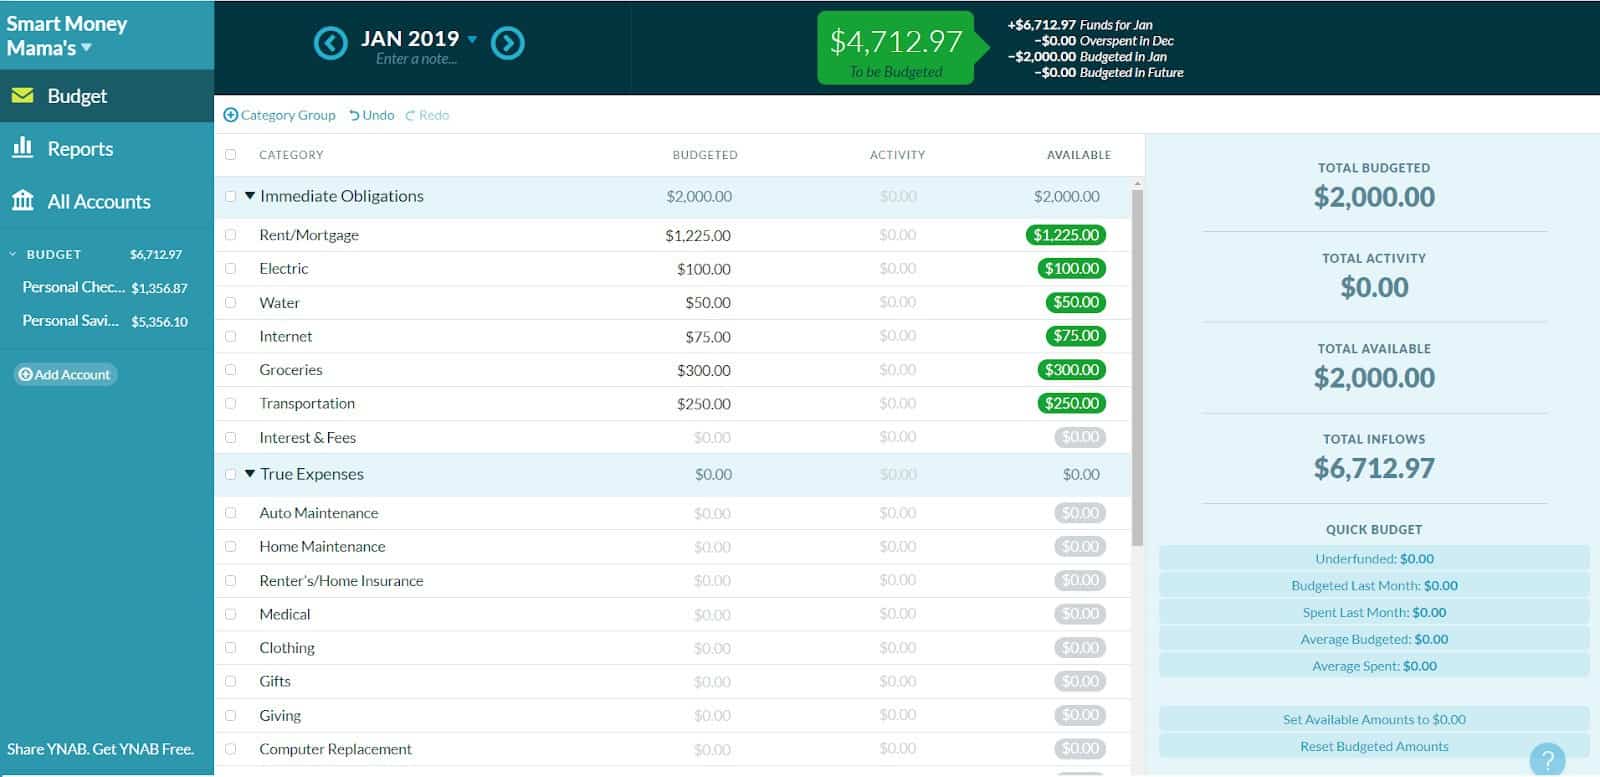
You’ll also notice that the available column is green. Green and Grey are good colors to see in the available column. This means you have a positive amount of money (green) or zero (grey) for that particular budget line.
Continue to budget your money until your “to be budgeted” bubble reaches zero. This will complete rule one for this particular inflow of money.
We have successfully given every dollar a job. Now, the key is to stay within your available money in each category when making purchases.
Adding Transactions to YNAB
When you are on the go I highly recommend using the YNAB app to add transactions. This will keep your budget up to date and you will know exactly how much money you have to work with for each category.
To enter transactions on the computer you will want to click on the particular account you need to add a transaction to.
Click “Add Transaction” and follow the prompts.
![]()
Each time you make a purchase or pay a bill you want to add a transaction. You can also add transactions for incoming money as well.
If you have your accounts linked your transactions are normally available to import within 24 hours.
Once you are done entering your transactions your budget will look something like this:
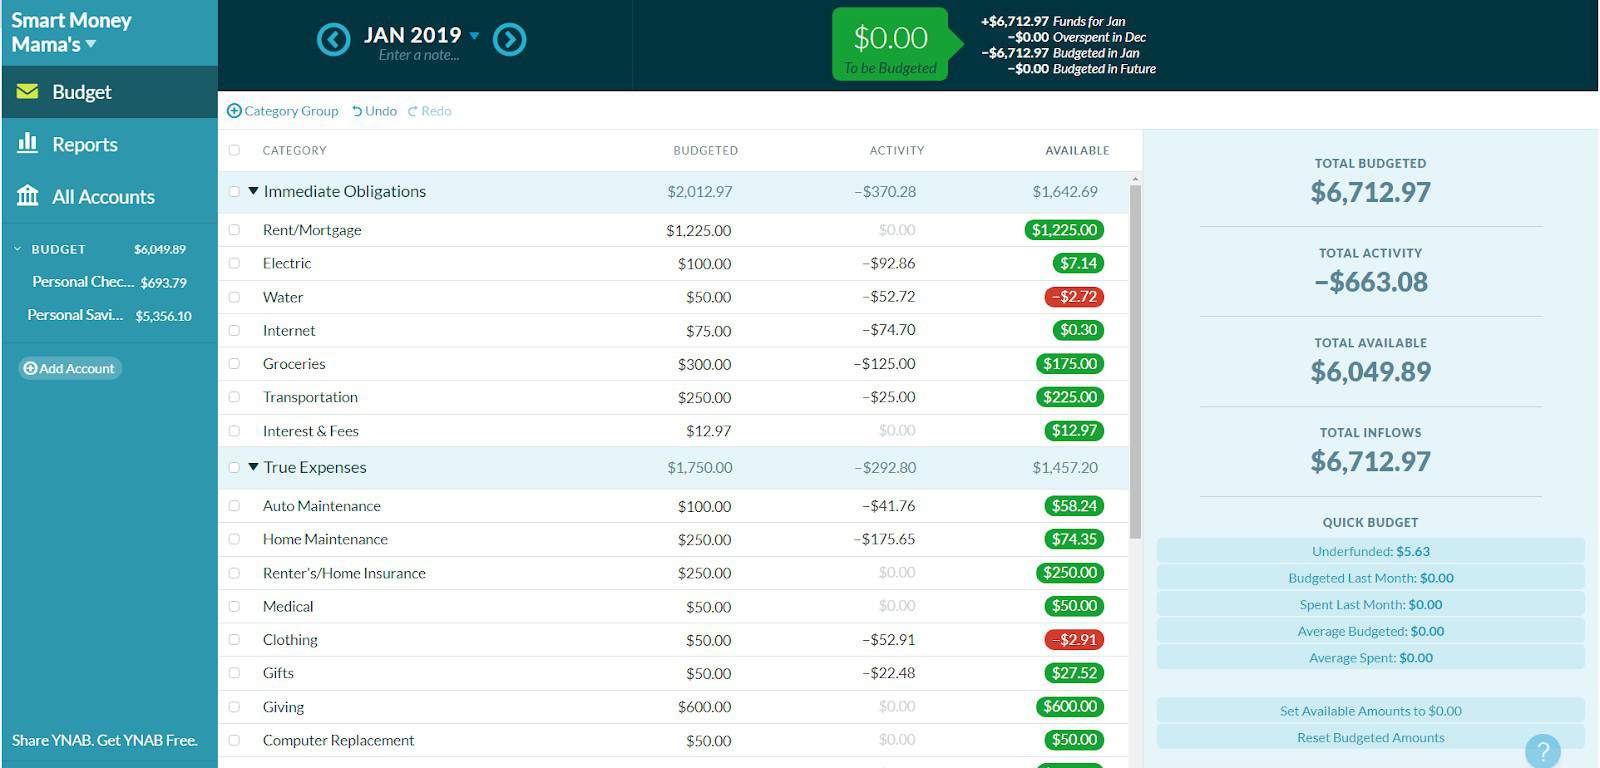
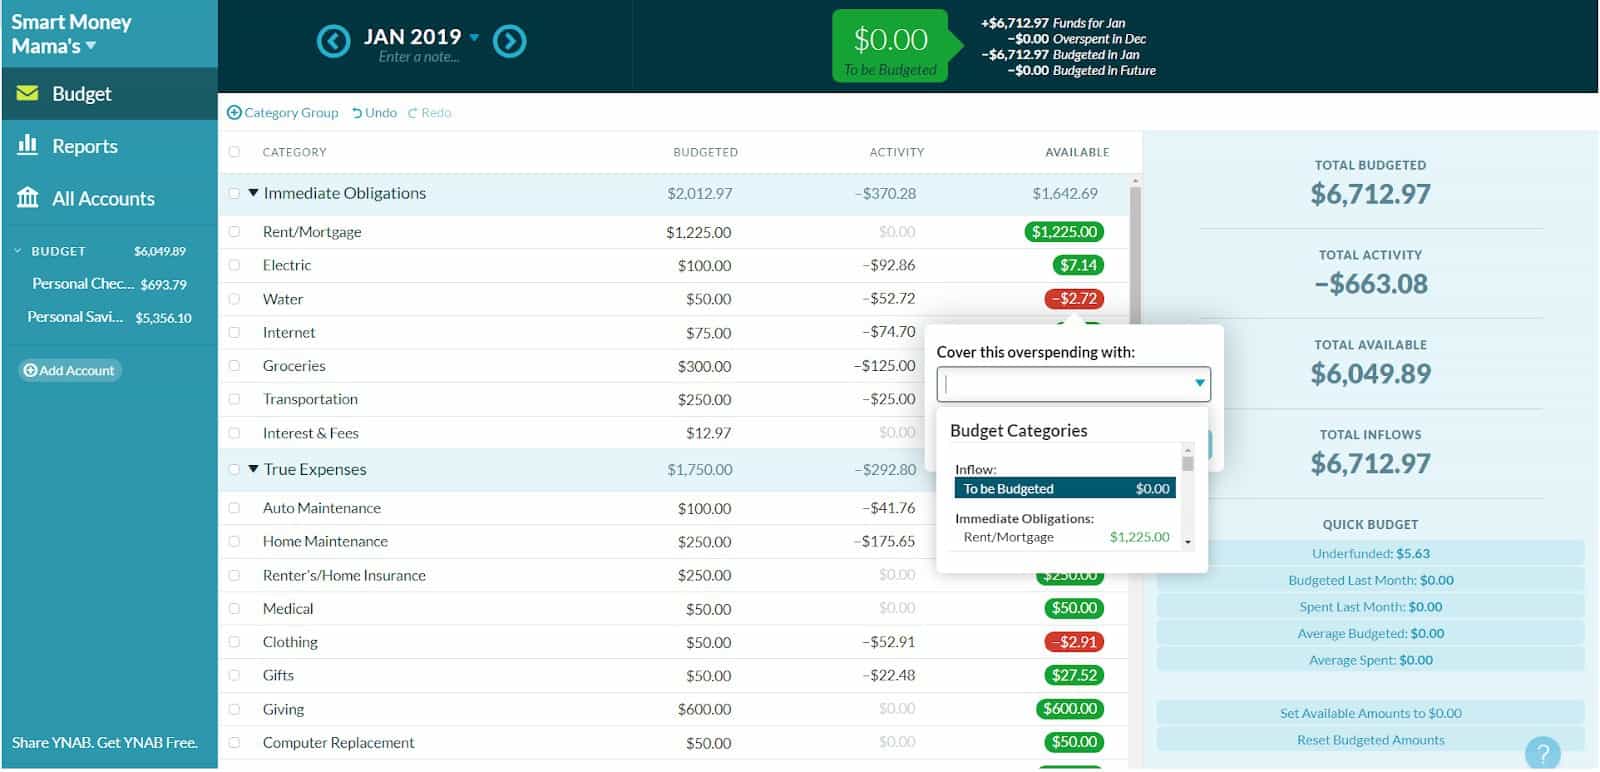
You will notice that I have had activity in a number of categories. YNAB takes your budgeted amount and subtracts your activity. This leaves your available balance. As you can see I have two categories with a red available balance. This means I went over budget.
Remember, we want the available column to be green (positive) or grey (zero).
How to Embrace YNAB Rule 3: Roll with the Punches
If you go over budget and have a red available balance you will want to use Rule Three: Roll with the Punches. This means we need to take from another category to ensure this expenditure is taken care of.
We no longer have an accurate representation of our budget. If you continue to spend what is available you will eventually have a negative bank account unless you have more income come in. You want to roll with the punches as soon as possible and ensure your budget continues to match your bank account.
To fix the red activity we will need to first decide where to take the money from to cover these expenses.
Did you add too much money to a particular budget category? You can pull some money from there. Or did you budget for an expense down the road, but you’ll have more income before then? That is also another place you can pull money from.
In my particular example, I am under budget on my electric bill. The easiest way to correct the overspending is by clicking on the red bubble. I can then type in the category I want to take money from or I can scroll down and select the correct category. This will deduct money from one category and move it to another.
As you continue to use YNAB throughout the month you’ll start to see patterns with your spending habits and can adjust your budget as necessary. That is one of my favorite parts of the software, you are not obligated to keep your budget how it was initially set up. The software is designed to be fluid and work with you as life happens.
Moving Forward with YNAB!
You now have the basics of YNAB under your belt. You can set up your budget, add transactions, roll with the punches, and begin to live with your budget. Don’t be afraid to change numbers and update your budget as you go. As you get in the habit of budgeting, you’ll find new irregular expenses that need sinking funds or categories where you have to shift your budget. And that’s ok! That means you’re paying attention and working with your money.
Yes, YNAB does make you look at your money differently, but it’s a good thing. If it takes you a few weeks to wrap your brain around the concepts, you’re not alone. Ask for support when you need it and keep trying.
If you need support while using the YNAB software, there are live workshops available. You can learn about the available classes on the YNAB website. I highly recommend taking a class on credit cards if you use them regularly. You will want to learn how to use the software properly to track credit card spending and payments.
YNAB also offers a Support Forum if you have questions. There is also a Facebook Group for YNAB Fans. All of these resources are available for you to use for FREE. I highly recommend utilizing them if you have any questions while using the YNAB software.
Change Your Family’s Financial Future With YNAB
Congratulations! You now have your first budget created and the resources you need to continue budgeting with YNAB.
Be sure to sign in regularly to update your spending. Set a reminder on your phone – possibly daily but at least weekly during your first few months. That way you’ll never have to enter too many transactions at once and can learn your family’s spending patterns.
I know this is hard. But the first time an unexpected expense or bill pops up and you have the cash to just cover it? Mama, it’s going to feel so good. You’ve got this!
Have you tried YNAB? Let me know in the comments how YNAB has changed your money mindset! And if you’re feeling stuck, post your questions here as well.